Blog
Krea 2 Turbo Resolution Test: 1MP vs 4MP on 12GB VRAM
Mickael
mediapixel team
A technical resolution benchmark of Krea 2 Turbo scaling from 1MP to 4MP with 12GB VRAM
Does generating directly at a higher resolution actually improve Krea 2 Turbo images, or does it mostly make you wait longer?
That was the question behind this benchmark.
Krea 2 Turbo already produces strong results around 1024×1024, but I had seen reports suggesting that increasing the starting resolution could produce richer compositions and finer detail. I wanted to test that claim on ordinary consumer hardware rather than relying on a few cherry-picked examples.
Using ComfyUI on an RTX 3060 with 12GB of VRAM, I generated four video-game-inspired scenes at five different resolutions, from 1024×1024 to 2048×2048.
The final campaign included:
- 4 character prompts
- 3 fixed seeds
- 5 resolutions
- 60 validated images
- 0 CUDA out-of-memory errors
- 0 failed generations
- 0 retries
The result was more nuanced than I expected.
Higher resolution clearly increased native image detail, but I did not observe a consistent improvement or decline in overall image quality. In many cases, the seed and the resulting pose had a much stronger influence than the resolution itself.
TL;DR
- Start near 1 megapixel when exploring prompts and seeds.
- Move toward roughly 2 megapixels for a practical balance between native detail and generation time.
- Reserve larger outputs with a longest side near 2048 pixels for selected final images.
- For portraits, 1280×1600 and 1152×1728 are useful balanced starting points.
- For landscapes, 1728×1152 and 1888×1056 are practical balanced options.
- Higher resolution increased native detail, but did not consistently improve or reduce overall image quality.
- Occasional hand and finger errors appeared irregularly and seemed more dependent on pose and seed than on resolution alone.
Why Test the Starting Resolution?
A common workflow is to generate near 1024×1024 and upscale afterward.
That approach is fast and practical, but it raises an interesting question:
Does generating directly at a higher resolution give Krea 2 Turbo more room to create fine details, or does it simply make the same image slower?
I focused on four areas:
- How generation time scales with resolution.
- Whether peak VRAM continues to increase.
- Whether native 2048×2048 images contain visibly finer detail.
- Whether higher resolutions introduce more anatomy errors, duplicated objects or composition problems.
To make differences easier to notice, I used recognizable video-game characters with very different materials and environments:
- Edward Kenway for water, ropes, fabric and background characters.
- Solid Snake for hands, weapons, tactical equipment and industrial lighting.
- Lara Croft for skin, hair, hands, vegetation and ancient architecture.
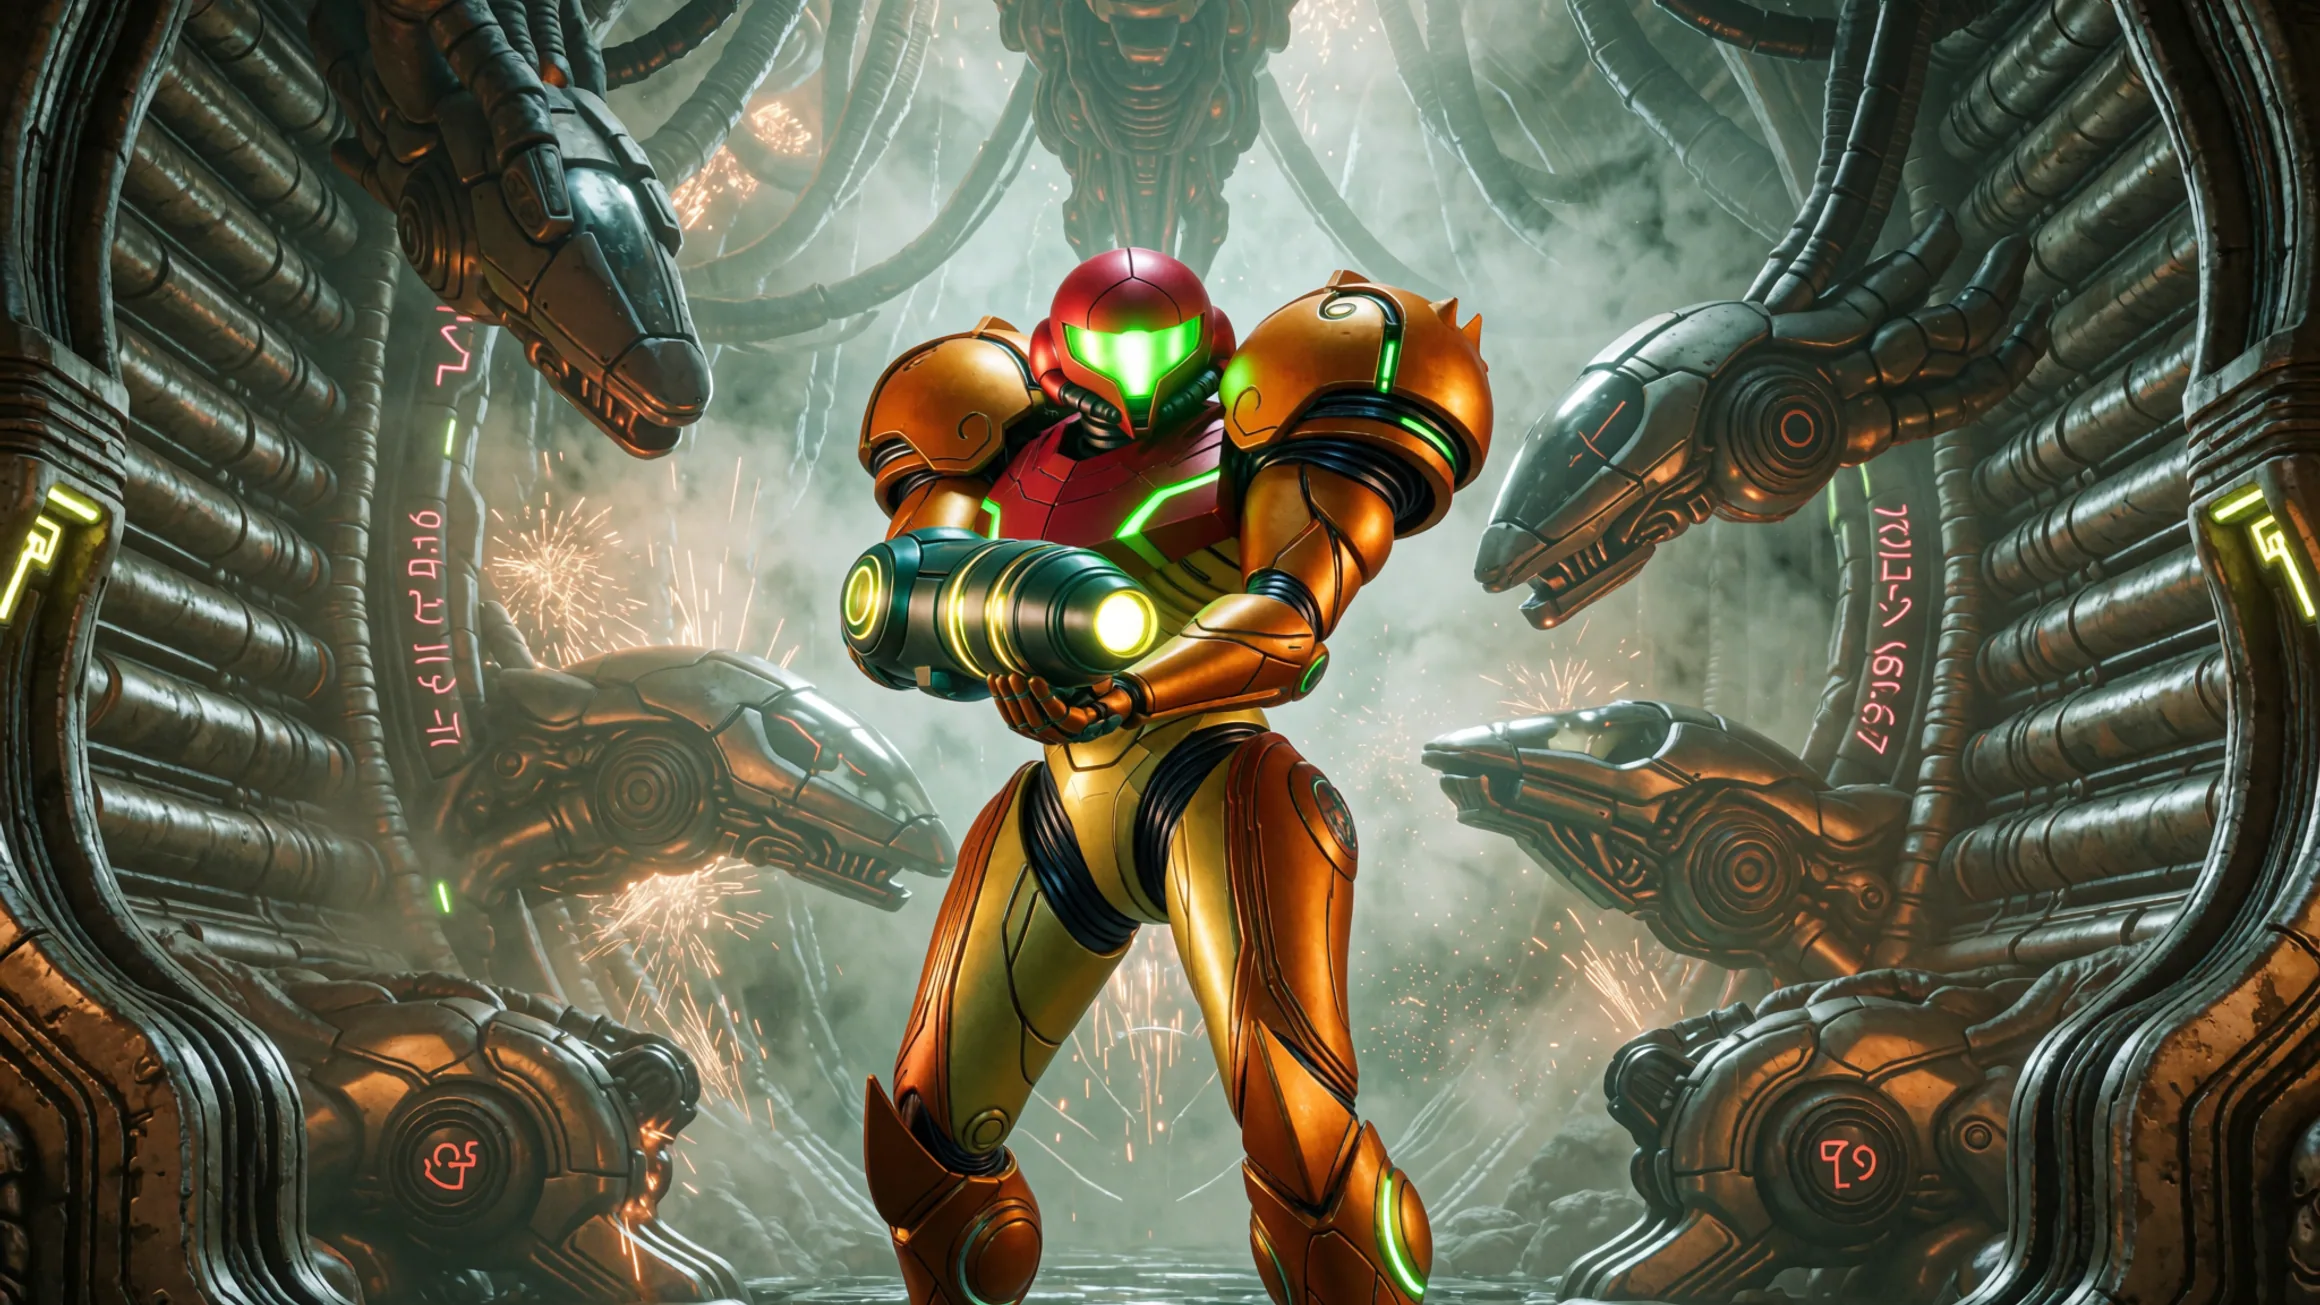
- Samus Aran for armor panels, reflections and hard-surface geometry.
Each prompt described a standalone cinematic scene with one clearly defined main character.
Test System and Workflow
The benchmark was performed locally in ComfyUI using:
- GPU: NVIDIA GeForce RTX 3060 12GB
- System RAM: 64GB
- Model: Krea 2 Turbo FP8
- Steps: 8
- CFG: 1.0
- Sampler: Euler
- Scheduler: beta57
- Batch size: 1
- LoRA: none
- Upscaling: none
- FaceDetailer: none
- Inpainting: none
- Post-processing: none
The same workflow, sampler settings and prompt text were used throughout the campaign.
The execution order was shuffled instead of always running resolutions from smallest to largest. This helped reduce simple order and temperature bias.
Verified Model Files
The exact model files loaded during the test were:
-
Krea 2 Turbo UNet
krea2_turbo_fp8_scaled.safetensors
13,141,730,784 bytes — approximately 12.24 GiB -
Qwen3-VL text encoder
qwen3vl_4b_fp8_scaled.safetensors
5,242,467,968 bytes — approximately 4.88 GiB -
Qwen Image VAE
qwen_image_vae.safetensors
253,806,246 bytes — approximately 242 MiB
The combined on-disk size of the UNet and text encoder is approximately 17.12 GiB, which is larger than the available 12GB of VRAM.
That does not mean both components remain fully resident in VRAM at the same time. However, the nearly constant VRAM ceiling and substantial non-sampler overhead are consistent with model offloading and repeated host-to-device transfers.
PCIe transfer volume was not measured directly, so this remains an evidence-based interpretation rather than a direct measurement.
Tested Resolutions
The same prompts and seeds were generated at:
- 1024×1024 — 1.05 MP
- 1216×1216 — 1.48 MP
- 1408×1408 — 1.98 MP
- 1600×1600 — 2.56 MP
- 2048×2048 — 4.19 MP
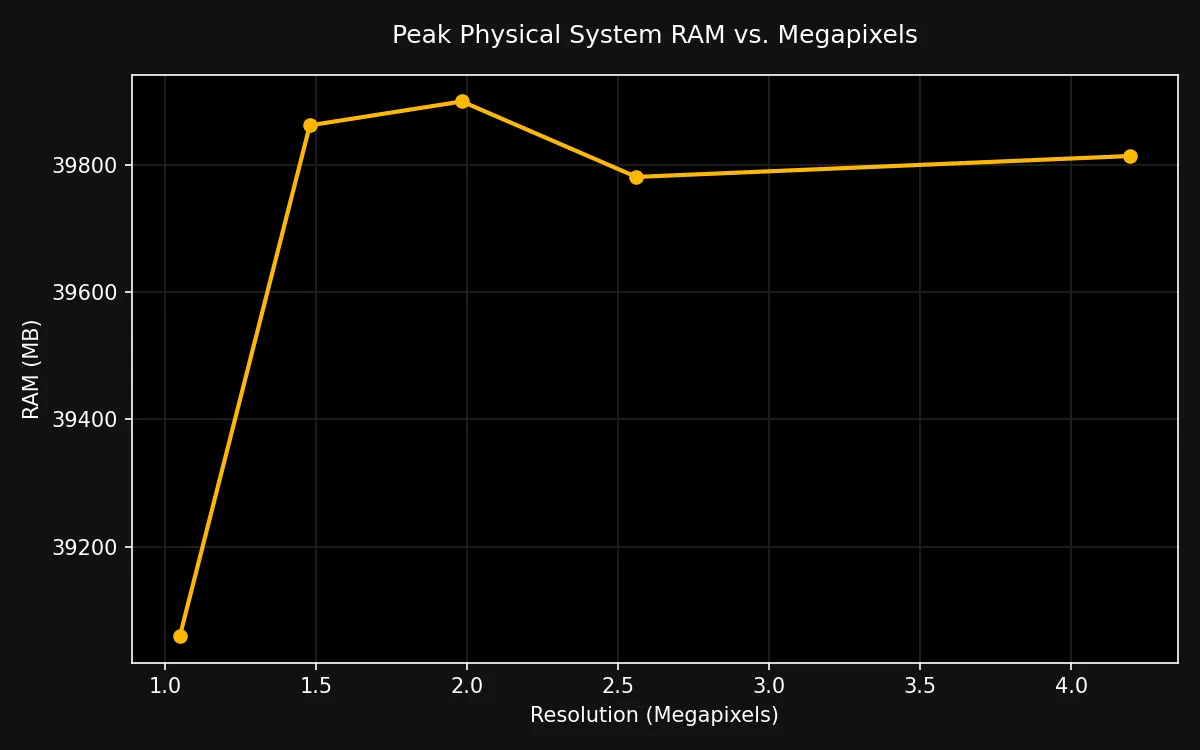
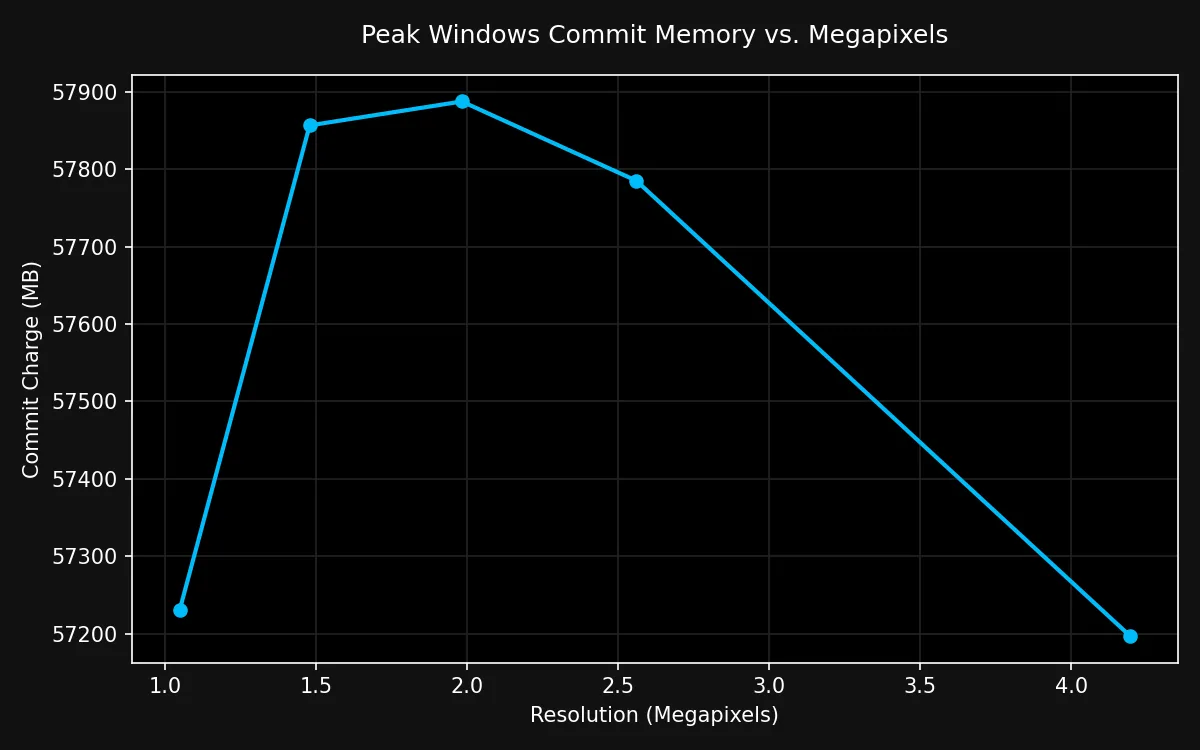
Telemetry was recorded during every generation, including:
- total generation time;
- sampler execution time;
- non-sampler overhead;
- peak VRAM;
- system RAM;
- Windows commit memory.
All 60 output files were checked for valid dimensions, successful decoding and matching SHA-256 metadata.
Generation Time Increased Sharply
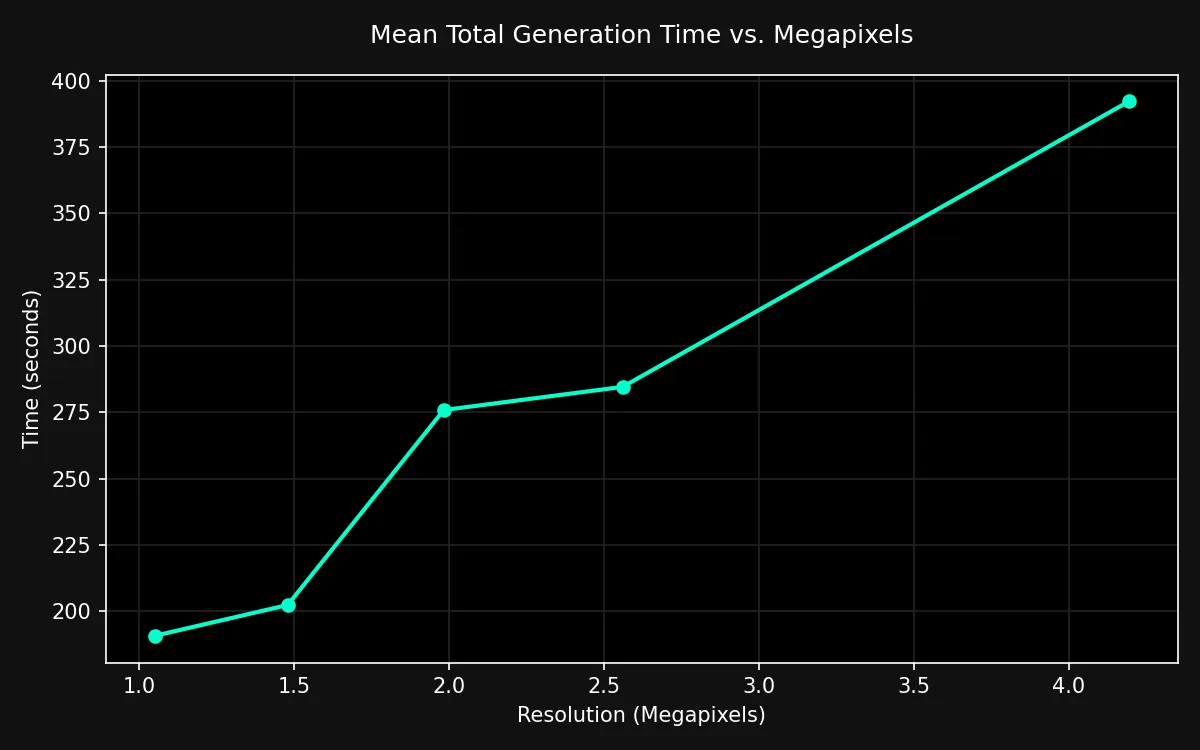
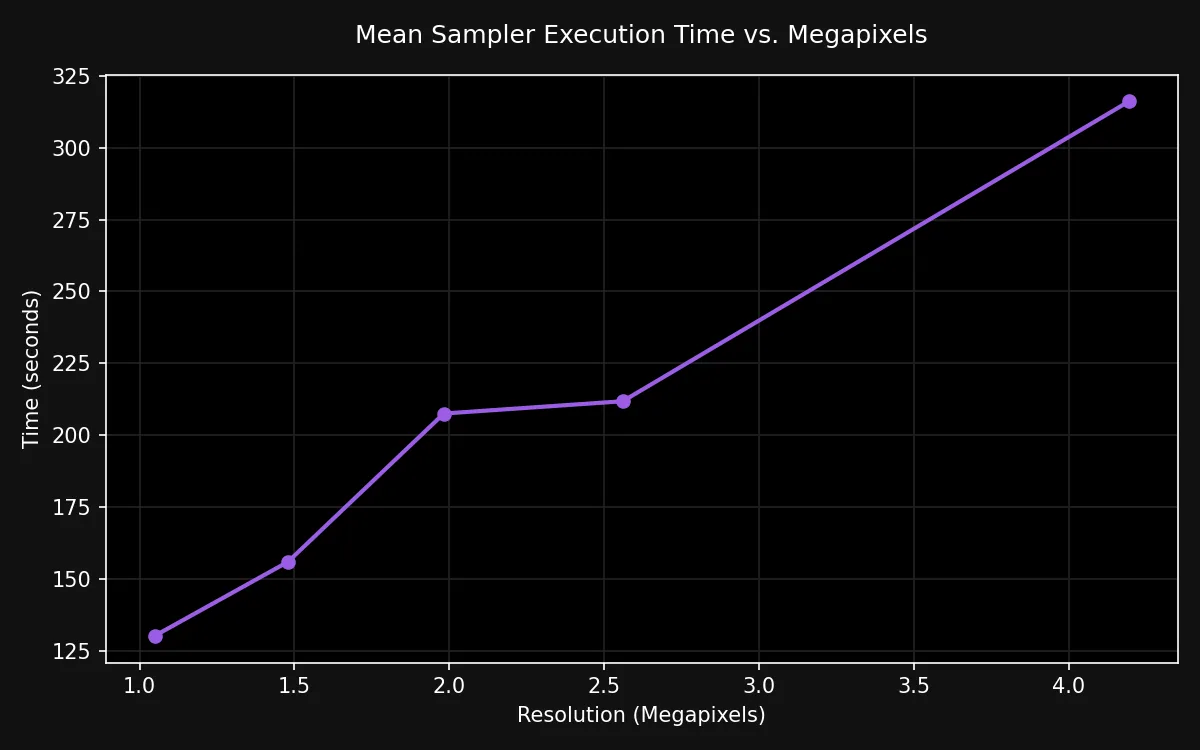
The clearest result was the increase in execution time.
| Resolution | Megapixels | Mean Total Time | Mean Sampler Time | Mean Non-Sampler | Mean Peak VRAM |
|---|---|---|---|---|---|
| 1024×1024 | 1.05 MP | 190.79s | 130.25s | 60.53s | 11,824 MB |
| 1216×1216 | 1.48 MP | 202.42s | 155.97s | 46.45s | 11,798 MB |
| 1408×1408 | 1.98 MP | 275.90s | 207.56s | 68.34s | 11,851 MB |
| 1600×1600 | 2.56 MP | 284.63s | 211.82s | 72.80s | 11,772 MB |
| 2048×2048 | 4.19 MP | 392.21s | 316.05s | 76.16s | 11,792 MB |
At 1024×1024, the average image took approximately:
3 minutes 11 seconds
At 2048×2048, the average increased to approximately:
6 minutes 32 seconds
So while the pixel count increased by roughly four times, the average total generation time increased by a little more than two times.
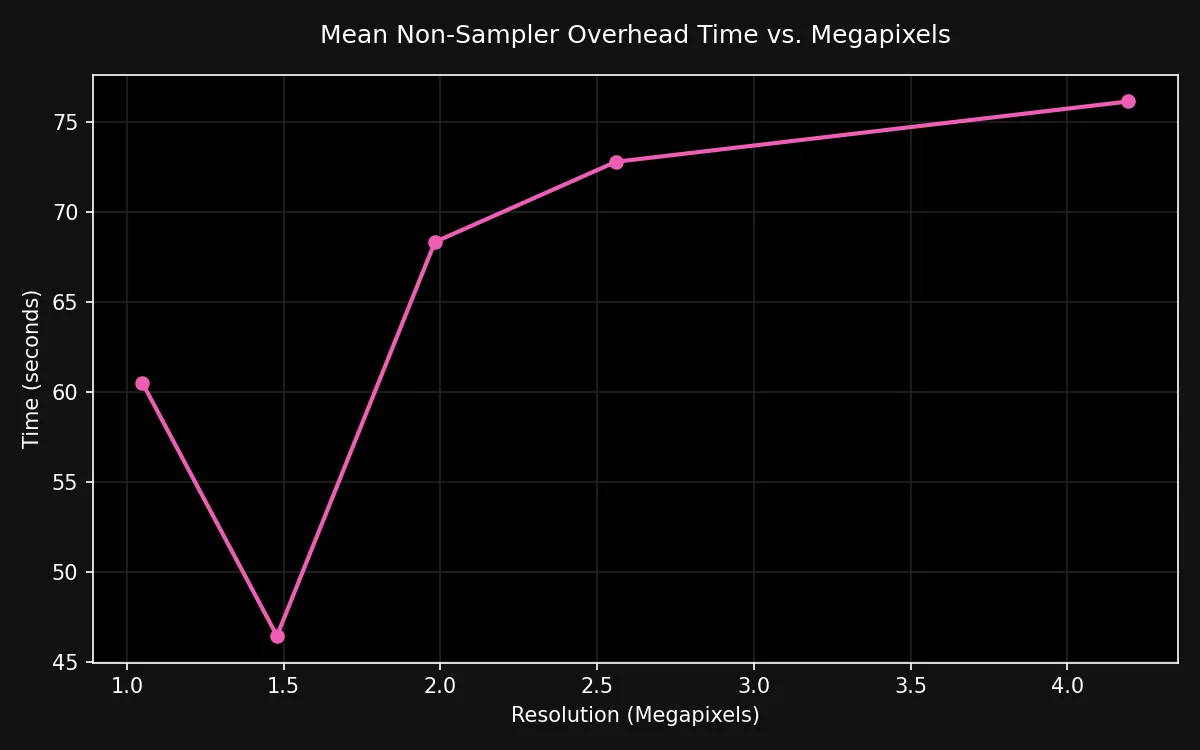
The sampler accounted for most of this increase.
The non-sampler portion remained substantial and somewhat variable, probably because the campaign used mixed resolutions and different model allocation states rather than repeatedly generating at one warmed-up size.
Peak VRAM Barely Changed
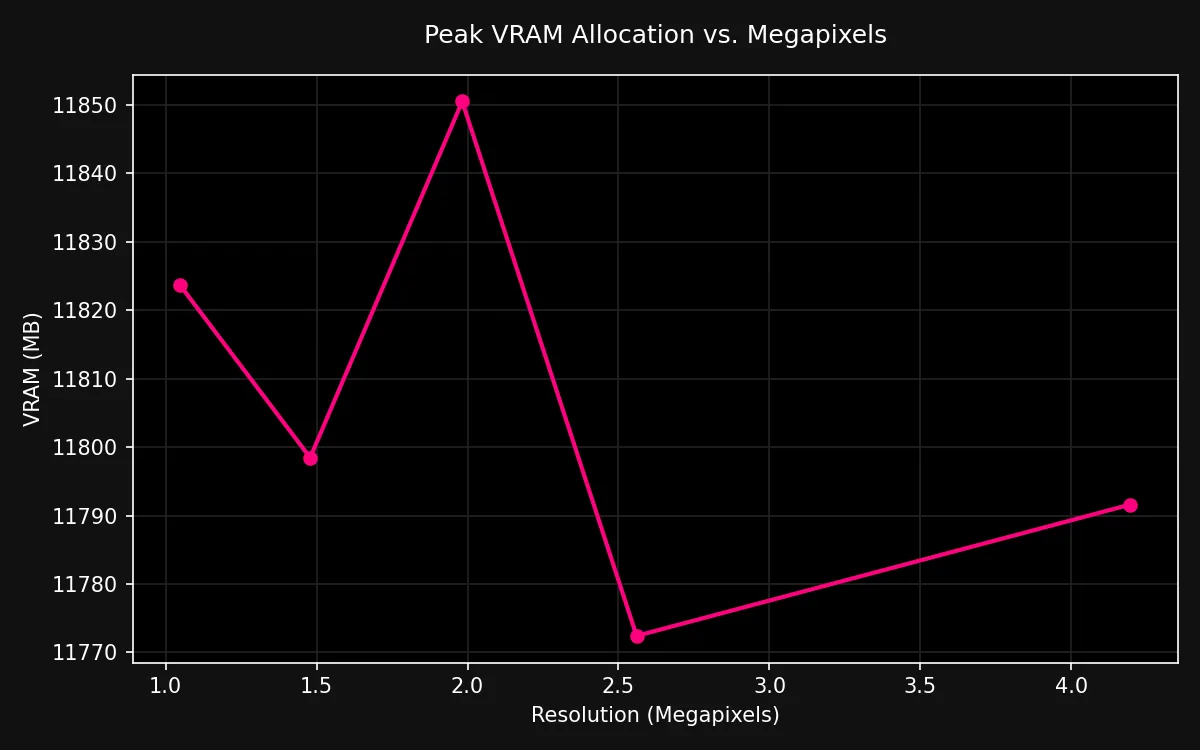
I expected higher resolutions to produce a clear increase in peak VRAM.
That did not happen.
Peak usage remained close to 11.8GB throughout the campaign:
- 1024×1024: approximately 11,824 MB
- 1216×1216: approximately 11,798 MB
- 1408×1408: approximately 11,851 MB
- 1600×1600: approximately 11,772 MB
- 2048×2048: approximately 11,792 MB
This does not mean that higher resolutions have no memory cost.
System RAM, commit memory, data transfers and execution time still matter. The result simply suggests that the RTX 3060 was already operating close to its usable VRAM ceiling at the lower resolutions.
Increasing the image size mostly increased processing time rather than the observed peak VRAM allocation.
The Visual Result Was More Subtle Than Expected
Before running the campaign, I expected a simple pattern:
- 1024×1024 would be coherent but less detailed;
- medium resolutions would offer the best balance;
- 2048×2048 would introduce obvious structural problems.
That was not what I observed when reviewing all 60 images and their native-resolution crops.
Across the campaign, I did not see a consistent loss of overall image quality as resolution increased.
Different resolutions often produced different:
- compositions;
- poses;
- camera distances;
- lighting choices;
- environmental details;
- rendering styles.
But those differences were not systematically better or worse.
The seed frequently had a stronger visible influence on composition, pose and scene interpretation than the starting resolution itself.
The clearest and most consistent advantage of 2048×2048 was simpler:
It produced a larger native image with finer visible detail.
What About Hands and Extra Fingers?
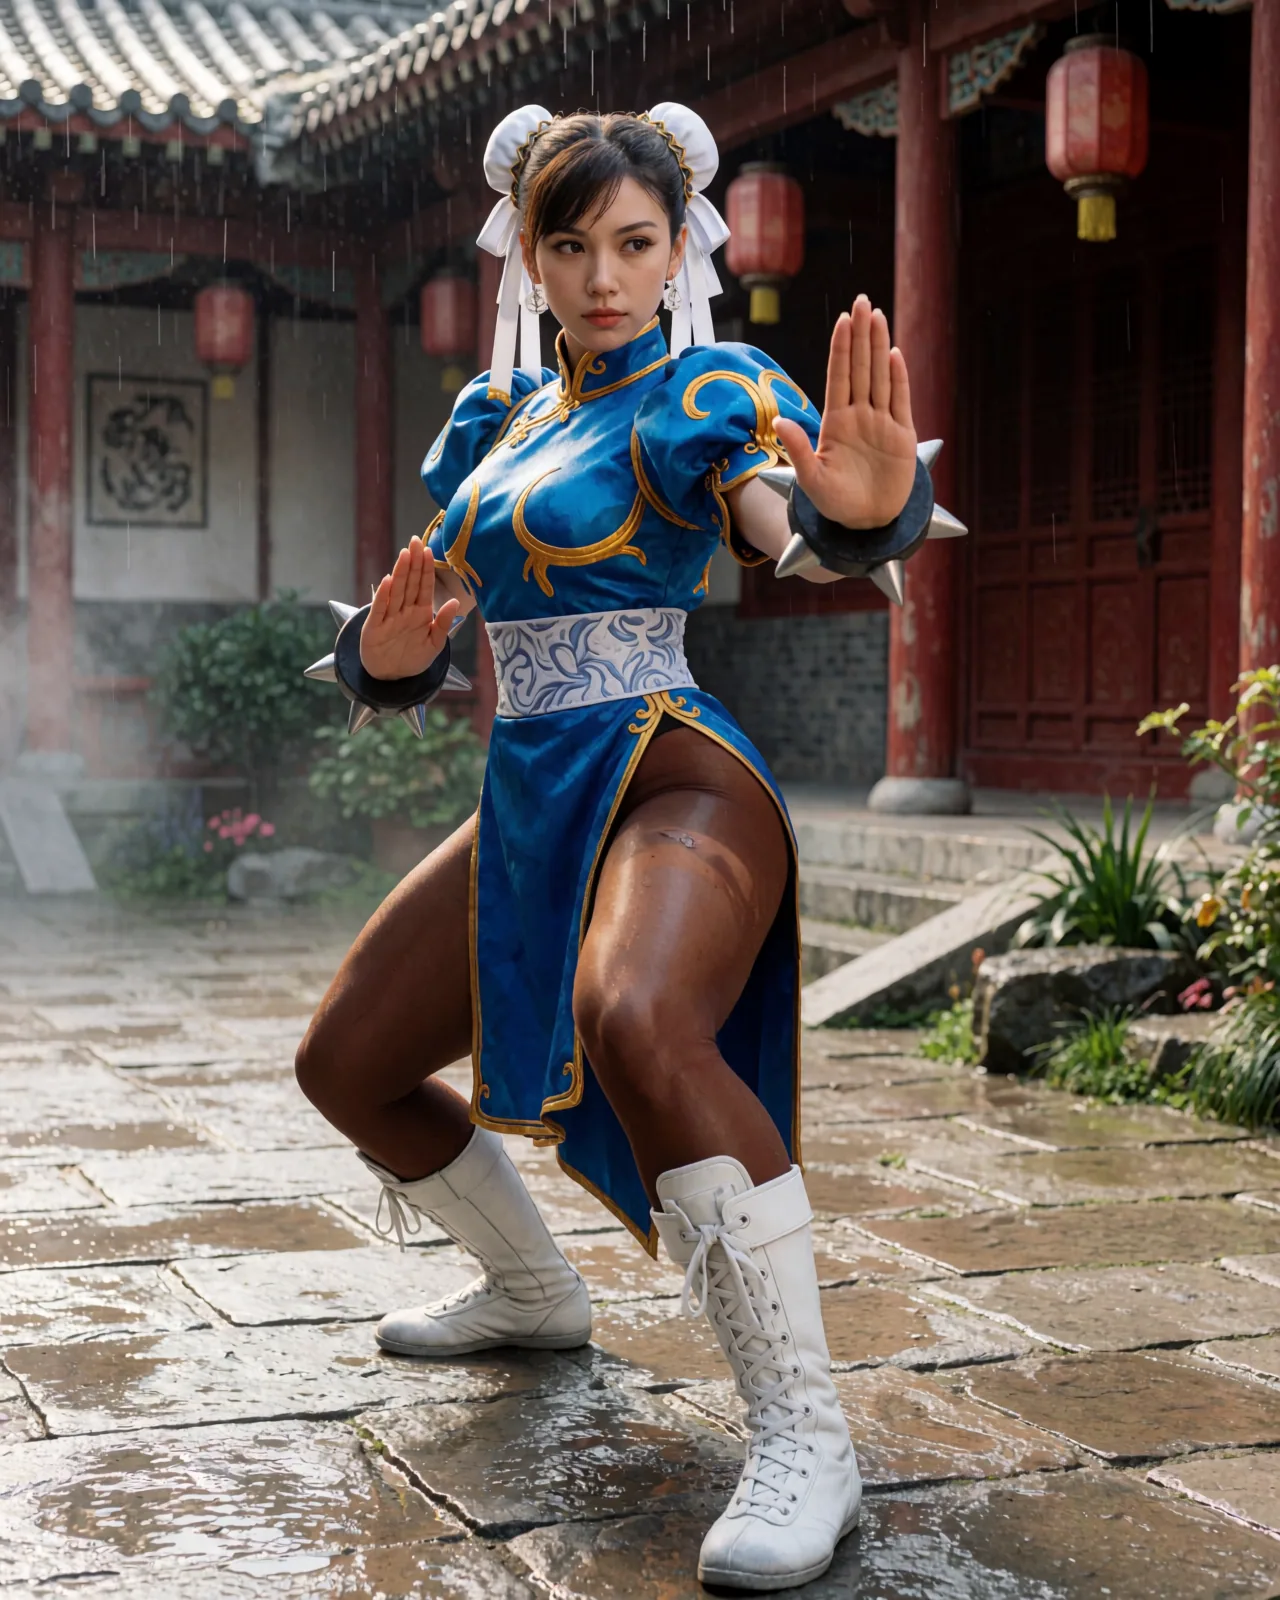
Some images contained familiar generative-model defects, including imperfect hands or an occasional extra finger.
However, these errors did not increase in a clear or consistent way with resolution.
They appeared to depend more heavily on:
- the pose of the subject;
- whether both hands were clearly visible;
- the angle of the fingers;
- whether the character was holding an object;
- the seed;
- the framing and scene composition.
Changing the resolution sometimes also changed the pose and placement of the hands. That makes it difficult to isolate resolution as the direct cause of a finger error.
In other words:
- higher resolution did not eliminate anatomy problems;
- lower resolution did not guarantee correct hands;
- 2048×2048 did not systematically produce more extra fingers in this dataset.
A dedicated anatomy benchmark would require many more seeds and tightly controlled hand poses.
This campaign was not designed to provide that level of isolation.
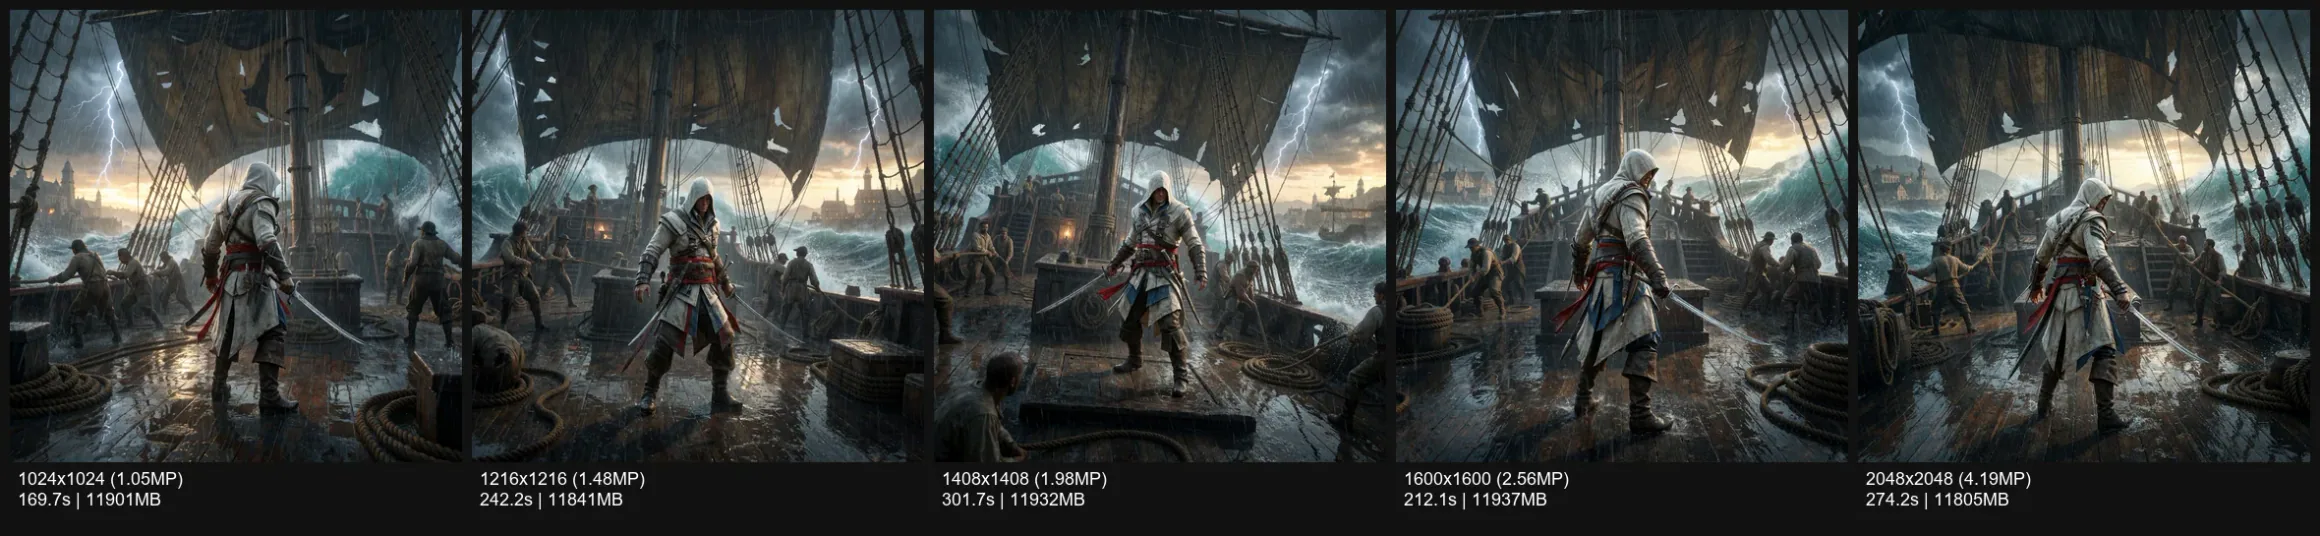
Same Seed Across Five Resolutions
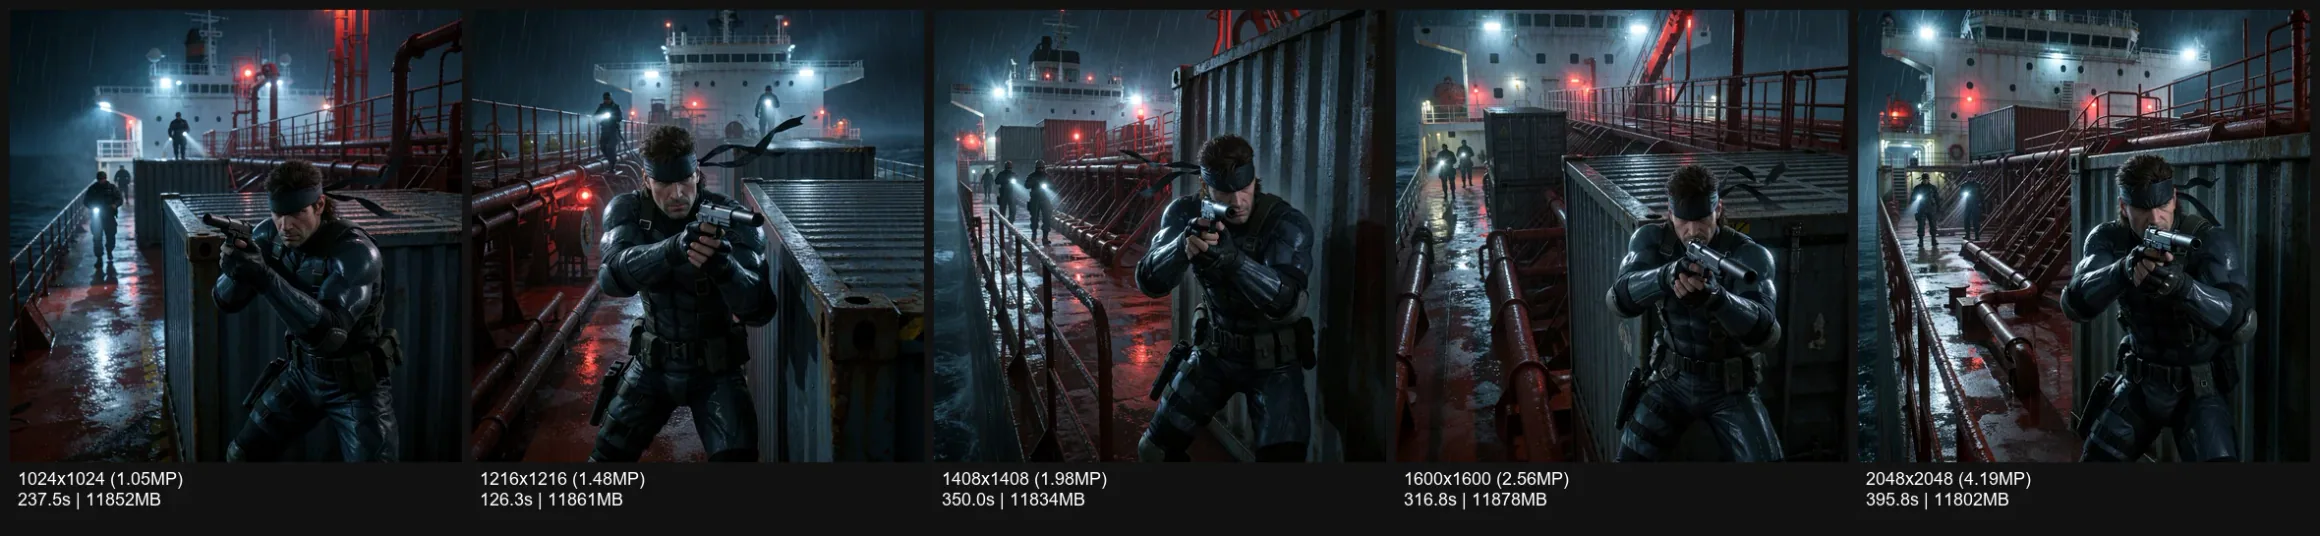
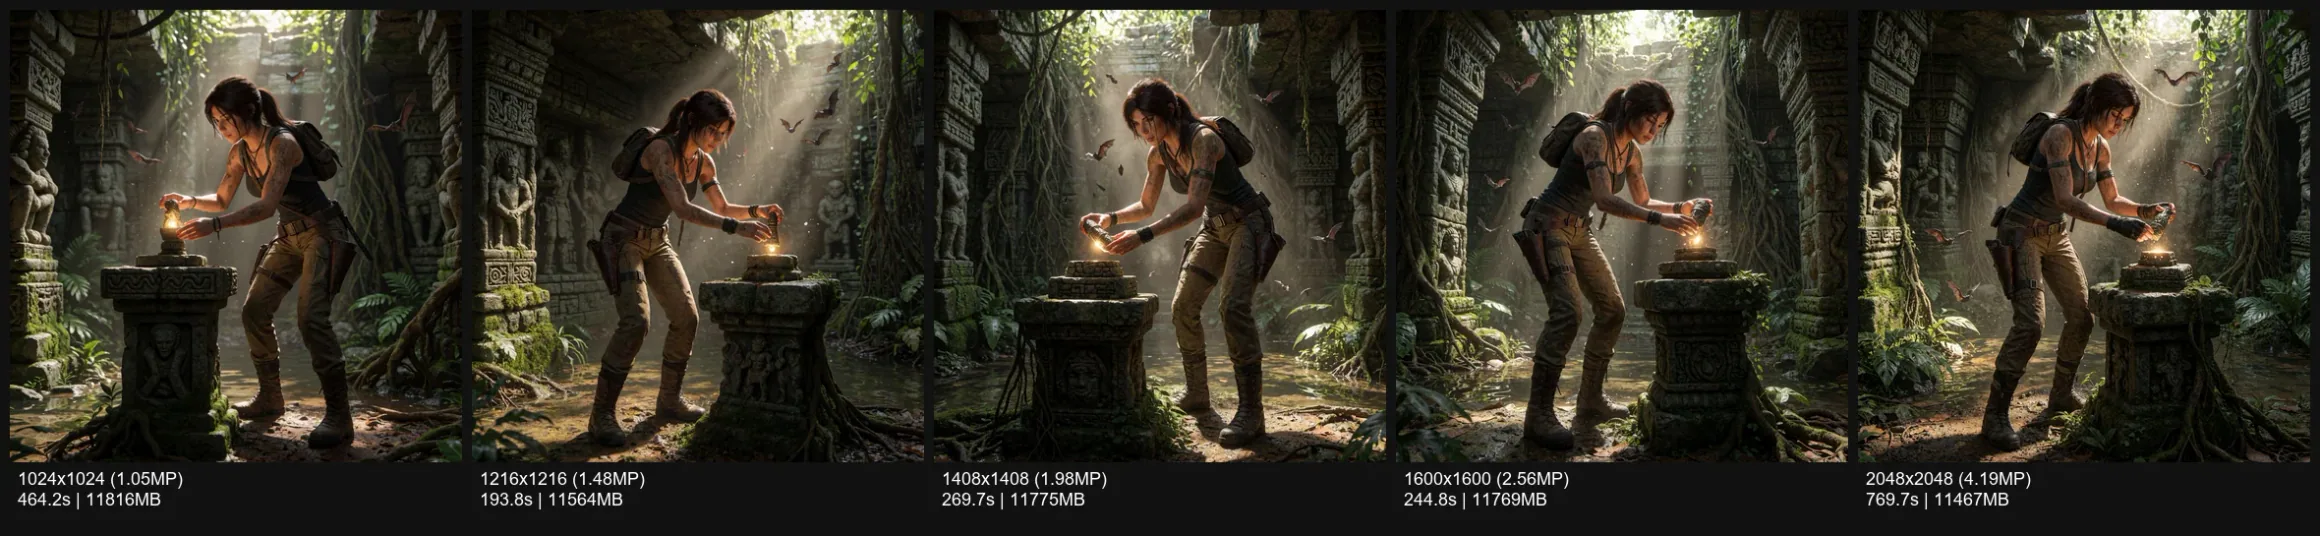
The following grids compare one seed across all five resolutions.
They show how the model reinterprets the same prompt and seed when the latent dimensions change.
Edward Kenway
Solid Snake
Lara Croft
Samus Aran
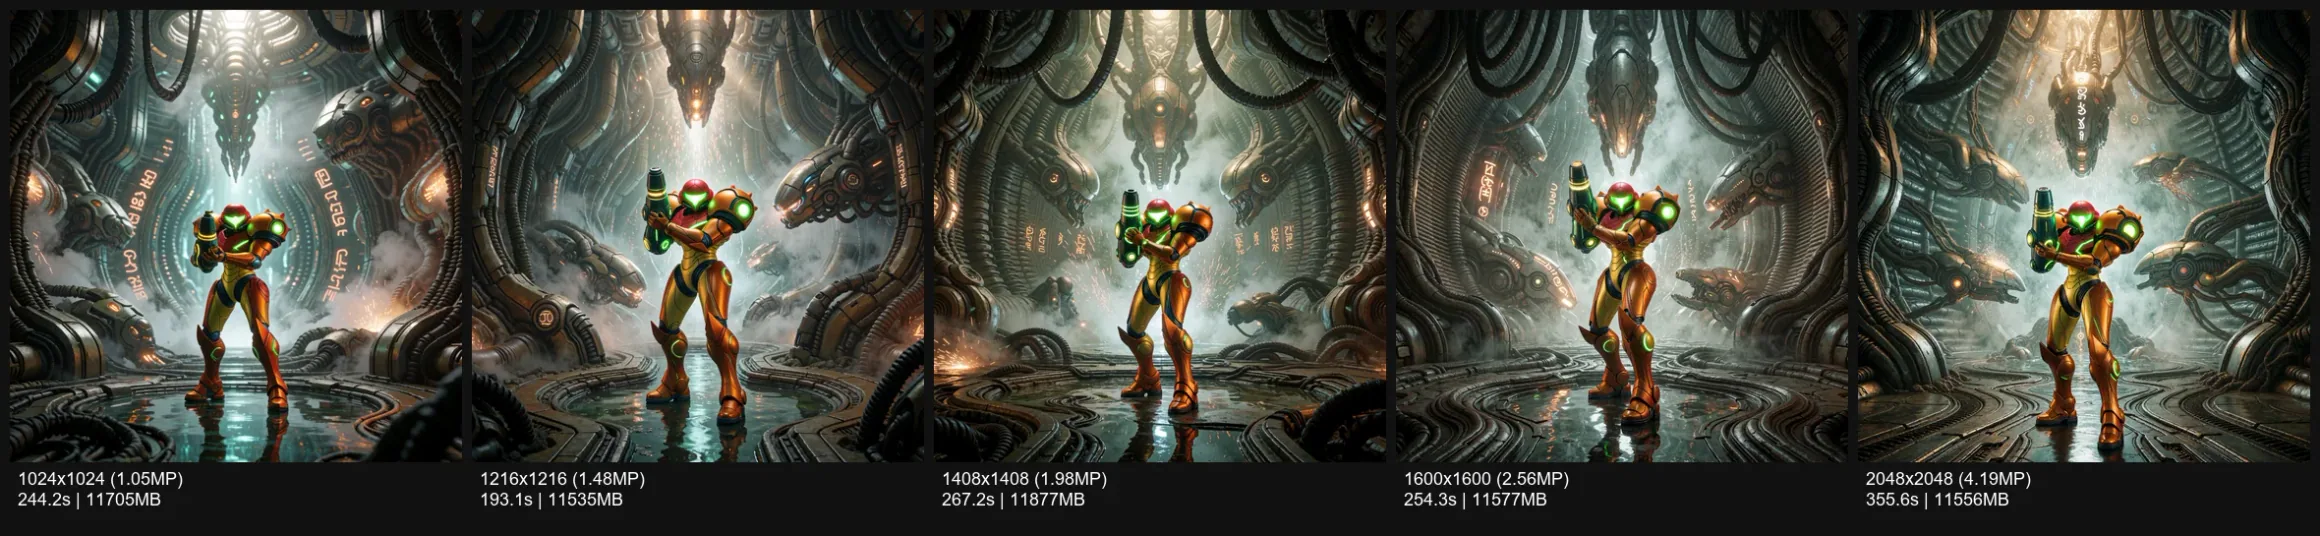
These comparisons also show why visual resolution benchmarks are difficult to judge purely by composition.
Even with the same seed, changing the dimensions can alter:
- framing;
- character position;
- scene layout;
- camera distance;
- lighting;
- background complexity.
A different composition is not automatically a worse composition.
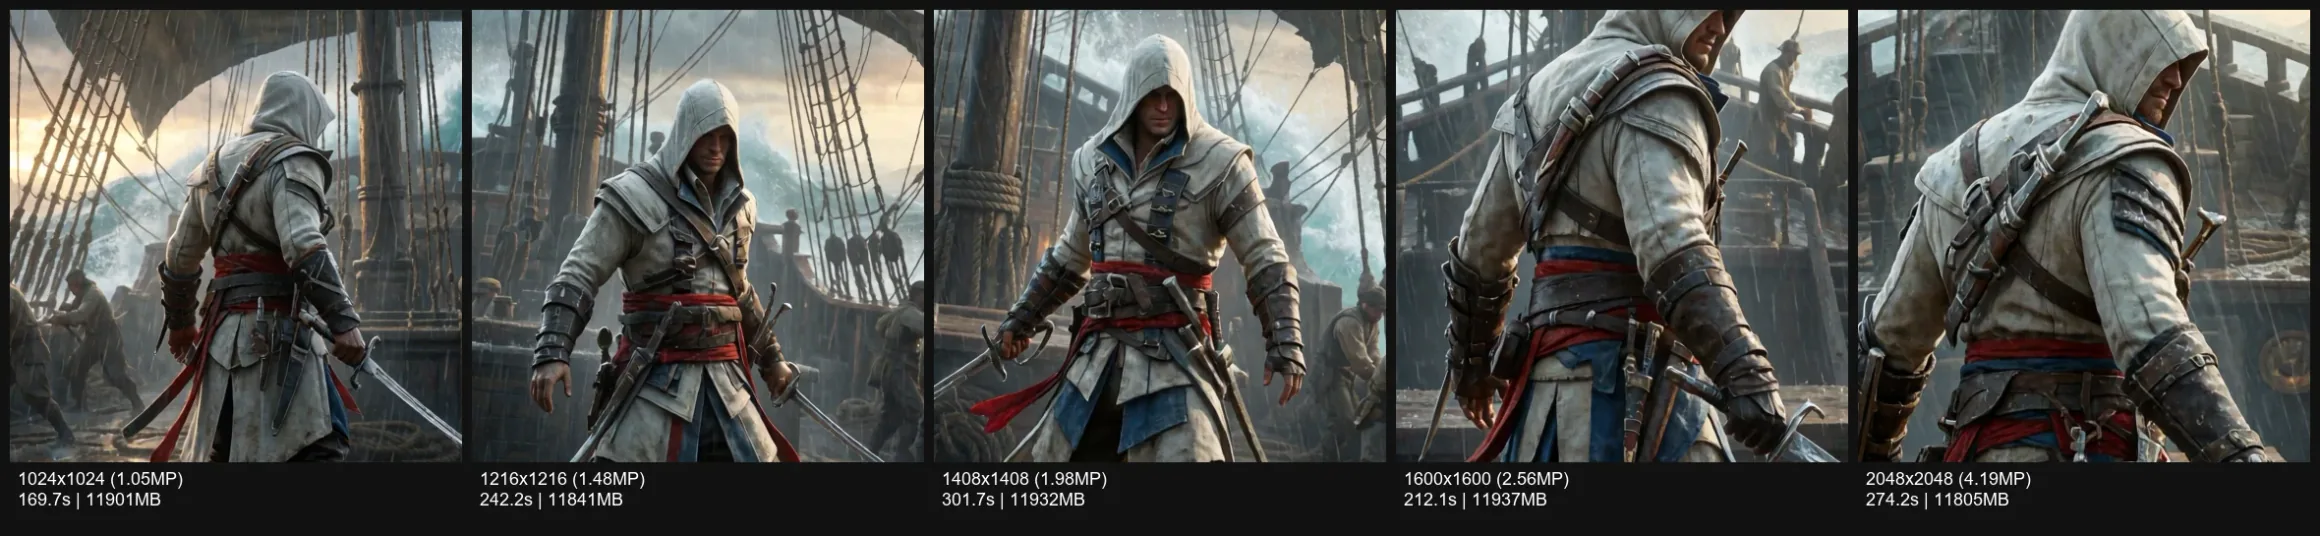
Native 1:1 Detail Crops
To evaluate actual native detail, I also compared pixel-perfect center crops without resizing the source images first.
This is more informative than displaying every full image at the same reduced size.
When a 2048×2048 image is downscaled to the same display size as a 1024×1024 image, much of its native detail advantage disappears.
Edward Kenway
Samus Aran
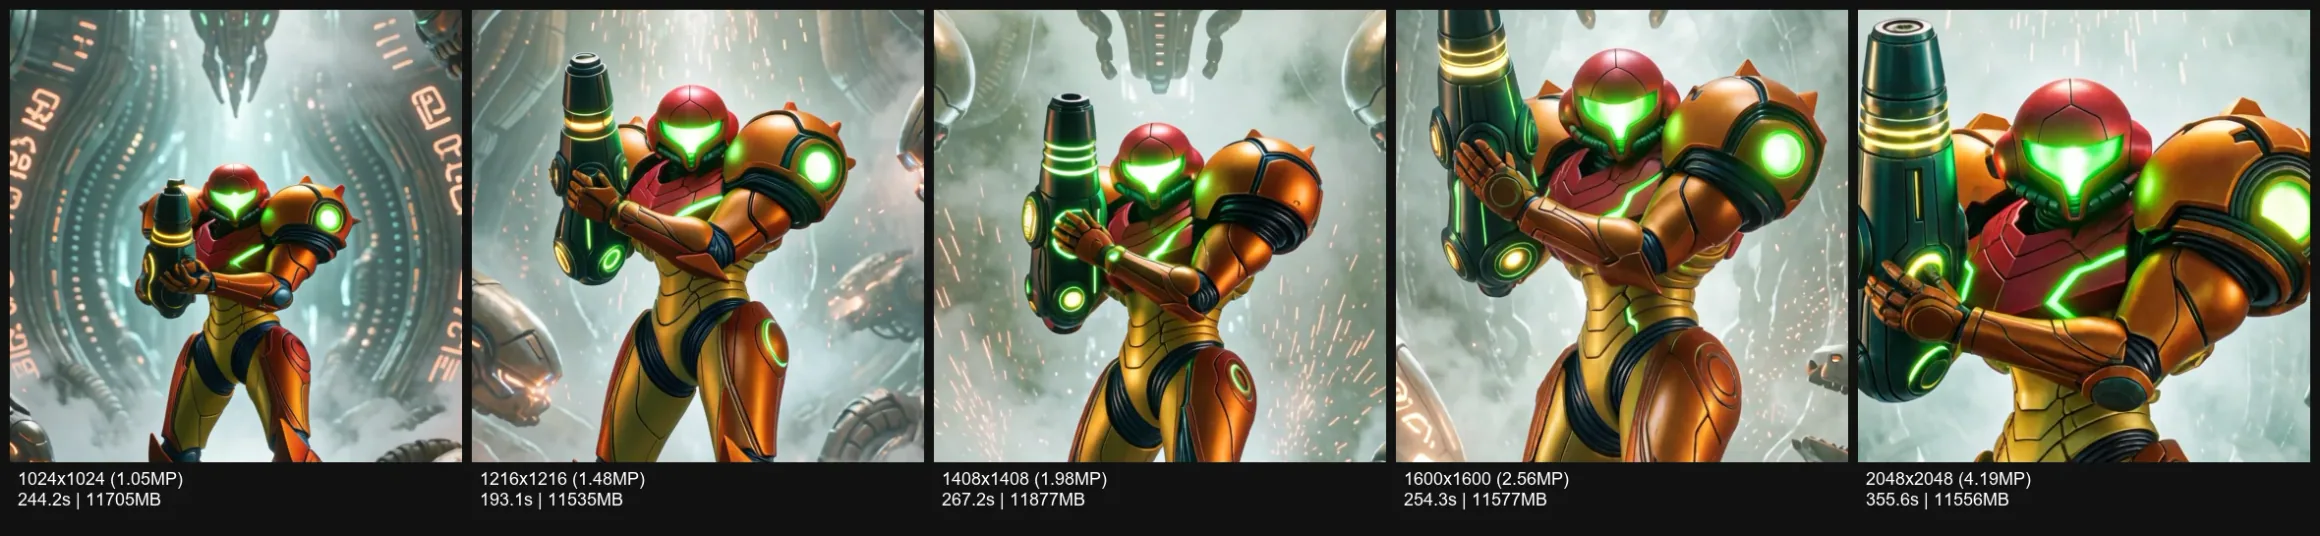
At higher native resolutions, the gains were most visible in areas such as:
- armor seams;
- stone carvings;
- fabric folds;
- hair strands;
- foliage;
- surface weathering;
- small metallic details;
- skin texture;
- background decoration.
These improvements were not always dramatic at normal webpage size, but they became more visible when zooming in or cropping the image.
Practical Resolutions for Portrait and Landscape Images
All benchmark images were generated at a 1:1 aspect ratio, but square images are not the most common format in everyday workflows.
For practical use, the tested pixel budgets can be translated into approximate portrait and landscape resolutions.
The values below are grouped into three tiers:
- Fast: approximately 1 megapixel, similar to 1024×1024.
- Balanced: approximately 2 megapixels, similar to 1408×1408.
- High: the longest side is capped near 2048 pixels.
The high tier does not always reach the same 4.19-megapixel area as a 2048×2048 square image. This is intentional: it keeps the longest dimension within the maximum size directly tested in this campaign.
| Use Case | Aspect Ratio | Fast | Balanced | High |
|---|---|---|---|---|
| Social portrait | 4:5 | 896×1120 | 1280×1600 | 1632×2048 |
| Classic portrait | 2:3 | 832×1248 | 1152×1728 | 1344×2016 |
| Vertical video / phone | 9:16 | 768×1376 | 1056×1888 | 1152×2048 |
| Classic landscape | 3:2 | 1248×832 | 1728×1152 | 2016×1344 |
| Widescreen landscape | 16:9 | 1376×768 | 1888×1056 | 2048×1152 |
| Traditional landscape | 4:3 | 1152×864 | 1632×1216 | 2048×1536 |
These dimensions are practical starting points rather than official Krea 2 Turbo presets.
4:5 Portrait
Recommended for:
- character portraits;
- fashion images;
- social-media posts;
- illustrations where the subject should occupy most of the frame.
Suggested starting points:
- 896×1120 for rapid testing;
- 1280×1600 for most final generations;
- 1632×2048 when facial, clothing and material detail matter.
The 4:5 ratio provides more horizontal room than 2:3 or 9:16, which can make arm and hand placement easier around a single subject.
2:3 Portrait
Recommended for:
- full-body characters;
- posters;
- book covers;
- cinematic standing poses;
- scenes requiring more space above and below the subject.
Suggested starting points:
- 832×1248 for rapid testing;
- 1152×1728 for a balanced final image;
- 1344×2016 for a larger native result.
This ratio is often more comfortable than 9:16 for full-body compositions because it provides vertical space without becoming extremely narrow.
9:16 Vertical
Recommended for:
- phone wallpapers;
- Shorts, Reels and TikTok backgrounds;
- tall environmental scenes;
- dramatic full-body compositions.
Suggested starting points:
- 768×1376 for rapid testing;
- 1056×1888 for a higher-detail vertical image;
- 1152×2048 when the longest side should remain within the tested 2048-pixel limit.
Very narrow formats can make composition more difficult. They may increase the chance of cropped limbs, oversized characters or vertically stretched scene layouts, especially when the prompt contains several subjects.
For that reason, 9:16 is not necessarily the best first format for testing a complex prompt.
3:2 Landscape
Recommended for:
- cinematic character scenes;
- photography-like compositions;
- environments with one main subject;
- general-purpose landscape images.
Suggested starting points:
- 1248×832 for rapid testing;
- 1728×1152 for a balanced final image;
- 2016×1344 for a larger native result.
This is probably the most versatile landscape ratio for scenes that need environmental context without becoming excessively wide.
16:9 Widescreen
Recommended for:
- desktop wallpapers;
- cinematic establishing shots;
- game concept art;
- YouTube thumbnails and video backgrounds;
- wide environments.
Suggested starting points:
- 1376×768 for rapid testing;
- 1888×1056 for a roughly two-megapixel result;
- 2048×1152 when the horizontal dimension should remain within the tested maximum.
The wider frame gives the model more room for scenery, but it can also encourage the main subject to become smaller or shift away from the center.
Prompts should therefore specify the intended framing clearly, for example:
- close-up;
- medium shot;
- full-body;
- subject centered;
- subject on the left third;
- wide establishing shot.
4:3 Landscape
Recommended for:
- illustrations;
- interior scenes;
- environments;
- group compositions;
- images where 16:9 feels too wide.
Suggested starting points:
- 1152×864 for rapid testing;
- 1632×1216 for a balanced image;
- 2048×1536 for a large native result.
The 4:3 ratio offers more vertical room than 16:9 and is often easier for scenes containing both characters and environment details.
A Practical Workflow
For most projects, I would not begin directly at the highest resolution.
A more efficient workflow is:
- Test the prompt and composition at the fast resolution.
- Explore several seeds.
- Select the most promising seed and framing.
- Regenerate it at the balanced resolution.
- Use the high tier only when the image is already close to the desired result.
For example:
Portrait workflow
- Start at 896×1120 or 832×1248.
- Test several seeds.
- Move the selected result to 1280×1600 or 1152×1728.
- Use 1632×2048 or 1344×2016 only for the strongest candidates.
Landscape workflow
- Start at 1248×832 or 1376×768.
- Validate the scene layout and subject placement.
- Move to 1728×1152 or 1888×1056.
- Use 2016×1344 or 2048×1152 for selected final images.
This avoids spending six minutes or more on every experimental prompt.
Important Aspect-Ratio Limitation
The performance results in this article are based entirely on square images.
Two images with a similar total pixel count should require a broadly comparable amount of image processing, but aspect ratio can still influence:
- composition;
- subject scale;
- pose;
- hand visibility;
- background complexity;
- the number and placement of objects;
- attention behavior inside the frame.
For example, a 1888×1056 image contains almost the same number of pixels as a 1408×1408 image, but it does not necessarily produce the same visual behavior.
The timing tiers are therefore useful estimates, while the visual recommendations should be treated as practical starting points that still need testing.
What This Benchmark Does Not Prove
This was a practical local test, not a universal quality study.
Its limitations include:
- one GPU;
- one ComfyUI installation;
- one Krea 2 Turbo checkpoint;
- four prompts;
- three seeds per prompt;
- square images only;
- no direct PCIe transfer measurement;
- no comparison with external upscalers;
- no comparison with a 24GB GPU;
- no blind multi-reviewer visual scoring;
- no dedicated anatomy or hand benchmark.
Because changing the resolution sometimes changed the pose and placement of the hands, this campaign could not isolate resolution as the direct cause of occasional finger or anatomy errors.
A larger test with tightly controlled hand poses would be needed to study that question properly.
The recognizable video-game characters used in this benchmark were technical test subjects only. They made it easier to notice changes in anatomy, materials, clothing, silhouettes and prompt adherence.
Final Verdict
The most interesting result was not that one resolution clearly defeated all the others.
It was that Krea 2 Turbo remained visually convincing across the entire tested range.
Increasing the starting resolution from 1024×1024 to 2048×2048 did not consistently improve composition, and it did not consistently damage it either.
It mainly provided:
- more native pixels;
- finer visible detail;
- more cropping flexibility;
- significantly longer generation times.
Higher resolution did not eliminate familiar model weaknesses such as imperfect hands or occasional extra fingers. Those defects appeared irregularly and seemed more closely related to the seed, pose and scene structure than to resolution alone.
For my own workflow, I would no longer choose a resolution only by looking at the width and height of a square image.
I would choose it according to the final aspect ratio and the amount of native detail I actually need:
- around 1 megapixel for prompt exploration, seed testing and composition work;
- around 2 megapixels for most serious portrait and landscape generations;
- larger outputs with the longest side near 2048 pixels for selected final images where native detail and cropping flexibility justify the additional render time.
In practical terms, that could mean:
- 896×1120 or 832×1248 while testing portrait prompts;
- 1280×1600 or 1152×1728 for more polished portrait results;
- 1248×832 or 1376×768 while exploring landscape compositions;
- 1728×1152 or 1888×1056 for higher-detail landscape images;
- 1632×2048, 2048×1536 or 2048×1152 when a larger final output is worth the wait.
So the answer is not that 2048×2048 is always better.
The more useful conclusion is that Krea 2 Turbo can handle larger native outputs surprisingly well on a 12GB RTX 3060. The best resolution depends less on a single universal sweet spot and more on the intended aspect ratio, the required level of detail and how much generation time each final image is worth.
The best resolution is not a fixed number. It is the point where aspect ratio, native detail and generation time make sense for the image you are trying to create.
Workflows and Prompt Downloads
The ComfyUI workflows and prompt setups used for this article are available in the companion repository:
The model files are available from the Comfy-Org Krea-2 Hugging Face repository.
What did you think of this post?
Share your feedback in one click!
Comments (0)
Join the discussion and share your thoughts
Leave a comment
No comments yet. Be the first to share your thoughts!
Related Articles
Continue reading with these posts and tutorials
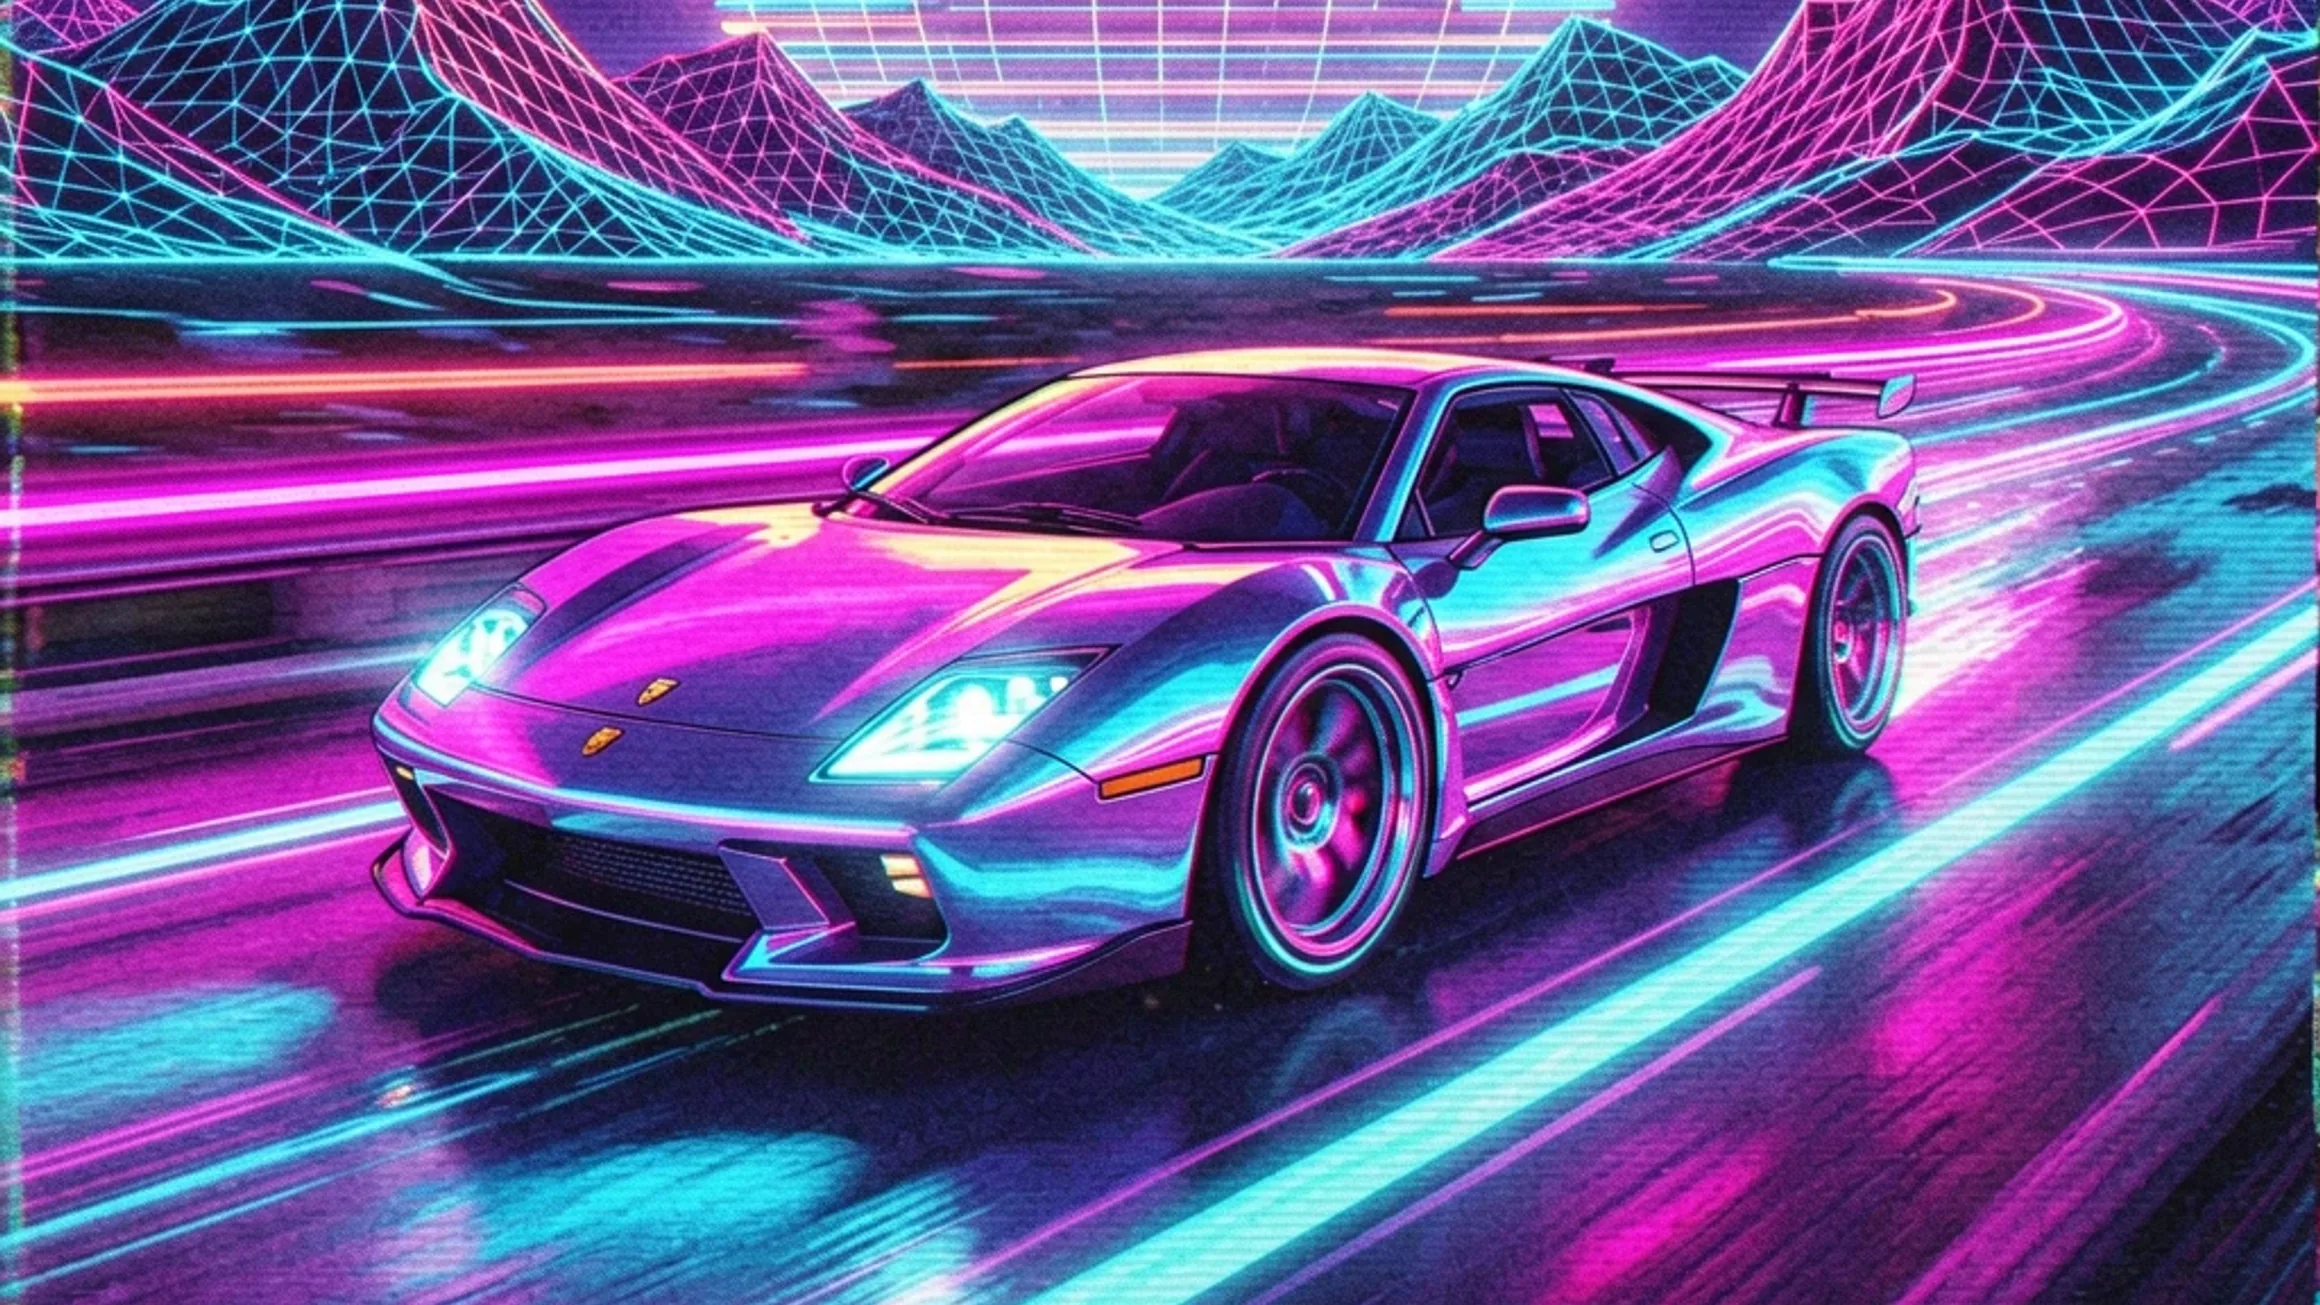
Qwen Image 2.1 vs ERNIE, Krea 2, HiDream and Z-Image on RTX 3060 12GB
Review draft of the final five-model 1024x1024 benchmark on an RTX 3060 12GB. Krea 2 Turbo finished first, ERNIE followed, and Z-Image-Turbo was the fastest retained workflow.
Sep 28, 2026
Mage-Flow Turbo vs FLUX.2 klein 4B on an RTX 3060 12GB
Which compact 4B model offers the better local workflow? Across 30 matched configurations on an RTX 3060 12GB, Mage-Flow generated images faster, while FLUX.2 klein produced cleaner results and the better overall quality/speed balance.
Jul 30, 2026
Mage-Flow vs Krea 2 Turbo on 12GB VRAM
A 60-image ComfyUI benchmark comparing generation speed, memory usage, character fidelity, photography and image quality on an RTX 3060 12GB.
Jul 28, 2026